【Notification of Manufacturer Change for Panasonic Industrial Devices SUNX Products and Panasonic Industrial Devices SUNX Tatsuno Products】
From April 1, 2024, the terms "Panasonic Industrial Devices SUNX Co., Ltd." and "Panasonic Industrial Devices SUNX Tatsuno Co., Ltd."
in this page and in the manuals and other documents to be downloaded will all be replaced with "Panasonic Industry Co., Ltd." and applied accordingly.
LH2H Hour Meters (Discontinued Products)
We are sorry, the products have been discontinued. Please refer to the details of the discontinued products and the recommended substitutes list below.
 |
June 30, 2023 |
|
|
Cautions For Use
Backlight type
| Voltage input type |
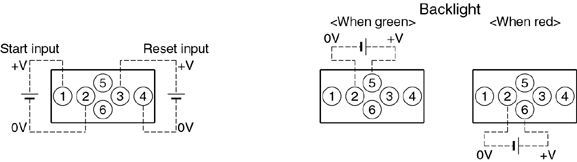 |
Terminal layout and wiring diagrams
LH2H Hour Meter Cautions for Use
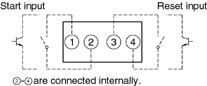
Non-voltage input type
For both panel mounting and PC board mounting types
| 1. |
Never apply voltage to the non-voltage input type.
This will damage the internalelements. |
| 2. |
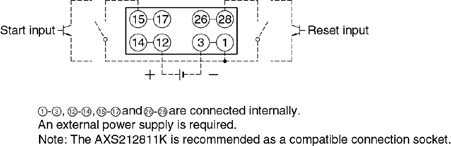
Since the current flow is very small from the start input and reset input terminals ((1) and (3) on the panel mounting type and (15) to (17) and (26) to (26) on the PC board mounting type) please use relays and switches with high contact reliability. When inputting with an open collector of a transistor, use a transistor for small signals in which ICBO is 1 μA or less and always input with no voltage |
| 3. |
When wiring, try to keep all the input lines to the start and reset inputs as short as possible and avoid running them together with high voltage and power transmission lines or in a power conduit. Also, malfunctions might occur if the floating capacitance of these wires exceeds 500 pF (10 m 32.808 ft. for parallel wires of 2 mm2). In particular, when using shielded wiring, be careful of the capacitance between wires. |
PC board mounting type
| 1. |
For external power supply use manganese dioxide or lithium batteries(CR type: 3V). |
| 2. |
Always reset after external power is applied and confirm that the display reads "0". |
| 3. |
Make the wiring from the battery to the hour meter unit as short as absolutely possible. Also, be careful of polarity. |
| 4. |
Calculate battery life with the following formula.
t = A / I
| t |
: |
battery life [h] |
| I |
: |
LH2H current consumption [mA] |
| A |
: |
battery capacity until minimum operation voltage is reached [mAh] |
|
| 5. |
Hand solder to the lead terminal. Do not dip solder. With the tip of the soldering iron at 300℃ 572℉ perform soldering within 3 seconds (for 30 to 60 W soldering iron). |
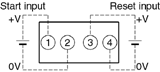
Voltage input type
| 1. |
Be aware that applying more than 30 V DC to start input terminals (1) and (2), and reset input terminals (3) and (4) will cause damage to the internal elements. |
| 2. |
For external resetting use H level (application of 4.5 to 30 V DC) between reset terminals (3) and (4) of the rear terminals. In this case, connect + to terminal (3) and -- to terminal (4). This is the valid polarity; therefore, the hour meter will not work if reversed. |
| 3. |
When wiring, try to keep all the input lines to the start and reset inputs as short as possible and avoid running them together with high voltage and power transmission lines or in a power conduit. Also, malfunctions might occur if the floating capacitance of these wires exceeds 500 pF (10 m/ 32.808 ft. for parallel wires of 2 mm2). |
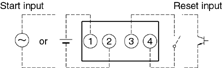
Free voltage input type
| 1. |
Use start input terminals (1) and (2) for free voltage input and reset input terminals (3) and (4) for non-voltage input. |
| 2. |
Be aware that the application of voltage that exceeds the voltage range of the H level to the start input terminal, and the application of voltage to the reset input terminal, can cause damage to the internal elements. |
| 3. |
Since the current flow is very small from reset input terminal (3), please use relays and switches with high contact reliability. |
| 4. |
When inputting a reset with an open collector of a transistor, use a transistor for small signals in which ICBO is 1 μA or less and always input with no voltage. |
| 5. |
To reset externally, short reset input terminals (3) and (4) on the rear. |
| 6. |
Input uses a high impedance circuit; therefore, erroneous operation may occur if the influence of induction voltage is present. If you plan to use wiring for the input signal that is 10 m 32.808 ft. or longer (wire capacitance 120 pF/m at normal temperature), we recommend the use of a CR filter or the connection of a bleeder resistor. |
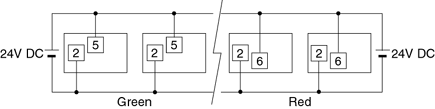
How to reset multiple panel mounting type counters all at once (input is the same for count)
| Non-voltage input type |
|---|
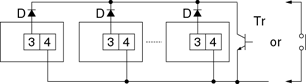 |
|
| Notes) | 1.Use the following as a guide for choosing transistors used for input (Tr). Leakage current < 1 μA |
|---|
| 2.Use as small a diode (D) as possible in the forward voltage so that the voltage between terminals 3 and 4 during reset input meets the standard value (0.5 V).
(At IF = 20 μA, forward voltage 0.1 and higher.) |
|---|
| Voltage input type |
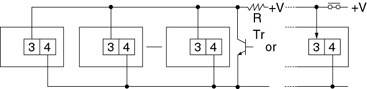 |
|
| Note) | Make sure that H (reset ON) level is at least 4.5V |
|---|
Backlight luminance
To prevent varying luminance among backlights when using multiple Backlight types, please use the same backlight power supply.
Acquisition of CE marking
Please abide by the conditions below when using in applications that comply with EN 61010-1/IEC 61010-1
- Overvoltage category II, pollution level 2
- Indoor use
- Acceptable temperature and humidity range: -10 to +55℃, 35 to 85%RH (with no condensation at 20℃)
- Under 2000 m elevation
- 2.Use the main unit in a location that matches the following conditions.
- There is minimal dust and no corrosive gas.
- There is no combustible or explosive gas.
- There is no mechanical vibration or impacts.
- There is no exposure to direct sunlight.
- Located away from large-volume electromagnetic switches and power lines with large electrical currents.
- 3.Connect a breaker that conforms to EN60947-1 or EN60947-3 to the voltage input section.
- 4.Applied voltage should be protected with an overcurrent protection device
(example: T 1A, 250 V AC time lag fuse) that conforms to the EN/IEC standards. (Free voltage input type)
Terminal connection
Tighten the terminal screws with a torqueof 0.8 N?cm or less.
Precautions in Using The LH2H Series
PDF data
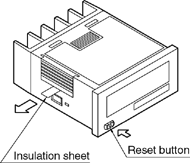
Insulation sheet
Before using a panel mounting type, please pull and remove the insulation sheet in the direction of the arrow.
In consideration that the product might be stored for long periods without being used, an insulation sheet is inserted before shipping.
Remove the insulation sheet and press the front reset button.
| LH2H hour meter (one-touch installation type) |
|---|
 |
|
| LH2H hour meter (installation frame type) |
|---|
 |
|
Waterproof construction
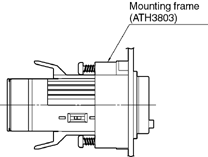
LH2H hour meter (installation frame type)
The operation part of the panel installation type (installation frame type) is constructed to prevent water from entering the unit and a rubber gasket is provided to prevent water from entering the gap between the unit and the panel cutout.
There must be sufficient pressure applied to the rubber gasket to prevent water from entering.
Be sure to use the mounting screws when installing the mounting frame (ATH3803).
| Note: | The one-touch installation type is not waterproof |
|---|
LH2H preset hour meter
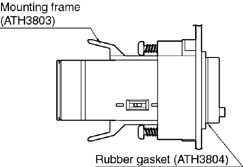
- 1.When using the waterproof type (IP66: panel front only), install the hour meter to the front plate with mounting frame ATH3803 (sold separately) and rubber gasket ATH3804 (sold separately).
Be sure to tighten using mounting screws.
| * | When installing the mounting frame and rubber gasket please remove the pre-attached o-ring. |
|---|
- 2.Panel installation order
- 1.Remove o-ring.
- 2.Place rubber gasket.
- 3.Insert hour meter into panel.
- 4.Insert mounting frame from the rear.
- 5.Secure with mounting screws (two locations)
Do not use in the following environments
- 1.In places where the temperature changes drastically.
- 2.In places where humidity is high and there is the possibility of dew
(When dew forms the display may vanish and other display errors may occur.)
Conditions of use
- 1.Do not use on places where there is flammable or corrosive gas, lots of dust, presence of oil, or where the unit might be subject to strong vibrations or shocks.
- 2.Since the cover is made of polycarbonate resin, do not use in places where the unit might come into contact with or be exposed to environments that contain organic solvents such as methyl alcohol, benzene and thinner, or strong alkali substances such as ammonia and caustic soda.
Cautions regarding battery replacement
- 1.Remove wiring before replacing the battery.
You may be electrocuted if you come into contact to a part where high voltage is applied.
- 2.Make sure you are not carrying a static electric charge when replacing the battery.
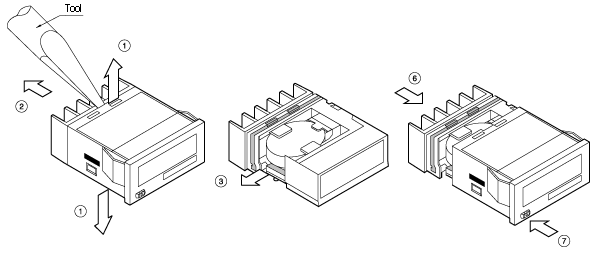
- 3.Battery replacement procedure
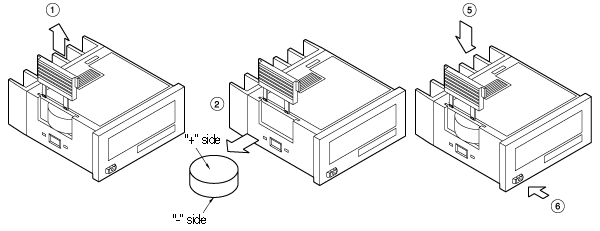
For LH2H hour meter (one-touch installation type)
- 1.Remove the up/down hook of the case using a tool.
- 2.Pull the unit away from the case.
- 3.Remove the battery from the side of the unit. Do not touch the display or other parts.
- 4.Before inserting wipe clean the surface of the new battery.
- 5.Insert the new battery with the "+" and "–" sides in the proper position.
- 6.After replacing the battery, return the unit to the case. Verify that the hook of the case has properly engaged.
- 7.Before using, press the reset button on the front.
For LH2H hour meter
(installation frame type)
- 1.Remove the battery cover from the case.
- 2.2) Remove the battery from the side of the case. The battery will come loose if you put the battery side face down and lightly shake the unit.
- 3.Before inserting wipe clean the surface of the new battery.
- 4.Insert the new battery with the "+" and "–" sides in the proper position.
- 5.After replacing the battery, return the battery cover to the case. Verify that the hook of the battery cover is properly engaged.
- 6.Before using press the reset button on the front.
Return to top
Return to top

 Business
> Industrial Devices
> Automation Controls Top
> FA Sensors & Components
> Timers / Counters / FA Componets
> Hour Meters
> LH2H Hour Meters(Discontinued Products)
> Cautions For Use
Business
> Industrial Devices
> Automation Controls Top
> FA Sensors & Components
> Timers / Counters / FA Componets
> Hour Meters
> LH2H Hour Meters(Discontinued Products)
> Cautions For Use